Showing posts with label Projects. Show all posts

Saturday, February 4, 2012

Time to Dust Off the Cobwebs

source:freedigitalphotos.net/
 Enough is enough!

Time to brush off the cobwebs and get this blog back into action.

I can't believe it has been almost 4 weeks since my last post.
Where have those weeks gone?

Can I let you in on a little secret?

I did have a thought that perhaps this little blog had run its race and 
that maybe it was time to close the door.............

But I know just how much I would miss it.

I have finally come to realise that this blog truly feeds my soul and gives me something 
to aspire to. 

It allows me to dream big dreams, indulge my creativity, share my joy
and then put it all on paper to share with whoever may be 
passing by. 


Without it - I know I would not have the incentive to try different things or discover new projects. 
The days would simply merge from one to another without any real 
sense of achievement or accomplishment.  

It is what keeps me alive and fresh and current. 
(Who would have thought a little ol' blog could do all that!) 


 So I have given my header a bit of a revamp -
Revealed my face for all to see (Hmm... I kinda liked hiding behind that kookaburra!)
and 
Injected some re-newed energy into these ramblings.


Hi everyone - can't wait to see what you have all been up to. 


It feels good to be back!


Monday, January 9, 2012

Put a Little Twinkle in your Life


Here's a super easy little project I put together over the Christmas holidays using my ever growing stash of "used" candle jars.

This little display of twinkling tea light lanterns positively lit up our festive season and provided the perfect backdrop for long leisurely family dinners out on the verandah.


Now I make no excuse for the fact that I am an absolute candleholic!  Along with fresh flowers - scented candles are the one thing I cannot live without.

Glasshouse Candles are my absolute favourite.
At the moment beautiful "Miami" with its unmistakable pomelo and grapefruit fragrance is wafting its way through the house.  Ah, bliss.....

A vase of flowers and a scented candle -  all is well in my world!

Equally as beautiful (and a good bit cheaper!) are the range of Glade scented candles which are available in most supermarkets. 
I usually have a couple of these on the go as well.  
"Vanilla" - "Wild Raspberry" - positively scrumptious!

Problem is - what to do with the jars once the candles have finished burning?


So this is where my little tea light lantern project was hatched.

I have put together this  tutorial as a perfect New Year recycling project.  


Step 1 :  So for this project you will need an empty candle jar (or 2 or 3);  wire; jute (string); pair of pliers/wire cutters; scissors, tealight candle.  (Gosh - my father's old pliers look positively antique!)

Step 2 :  Cut a piece of wire long enough to wrap around the base of your jar and cross over at the side.  

Step 3 :  Grab your pliers and twist the wire until the wire is firmly secured around the base of the jar.  

Tip :  Because the jar is slightly tapered, i.e. smaller circumference at the bottom than the top - if you secure it firmly at the base it won't slip up over the top of the jar.

Step 4 :  Snip off an excess wire with a pair of wire cutters and then twist your little wire knot slightly towards the top.


Step 5 :   Cut 3 lengths of jute/string depending on how long you want your lanterns to hang.   I staggered mine so that some lanterns were slightly shorter than others.   Hmm... not sure about the colour? of this string but it was all I could find at the time and it does look slightly festive looking - don't you think?


Step 6:  Remove the wire cradle from the jar and tie lengths of string equi-distant around the circumference of the cradle.


Step 7 :  Place your jar back in its wire cradle.

Step 8 :   Now gather your lengths of string together and hold at the top.  Lift off your surface to make sure it is hanging straight.  Adjust your string lengths if needed.  (Last thing you want is a crooked candle!)

Step 9:   Once you are happy that your lantern is hanging straight - tie a knot with the three lengths of string around 5-10 cm from the end.

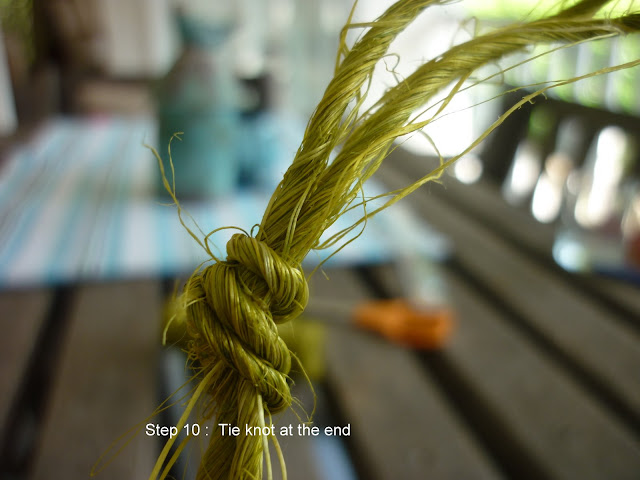
Step 10 :    Then tie another knot right at the end. 

Step 11 :   Snip off the excess string

Step 12 :  Grab your tea light.  (I picked up a box of 100 tea lights from Target for $7)


Step 13 :    Place tea light in the base of the jar.

Step 14 :  Secure (between the two end knots) to a nail or hook.   Yes, that is a jungle out there!


And then once dusk comes.......


Light up and enjoy!

(I love my little lanterns so much that they are staying up ALL year).


I hope you manage to get a little twinkle in your life in 2012!


Linking up with


Funky Junk's Saturday Nite Special

Friday, December 9, 2011

A Tale of Three Cushions

Last day of term - yah!!   I can't believe how neglectful I have been of this little blog.  The last 4 weeks of the school year have been so incredibly hectic - I have barely had time to even keep track with what my favourite bloggers have been up to let alone find time to actually blog.  

Can't wait to get stuck into all the projects I have planned for the summer holidays.  Hopefully I will also be able to find some time for a bit of R&R. and lots of  blogland "catch up."


In the midst of all the end of year craziness however, I did find time to whip up a little trio of cushions to give as Christmas gifts to three of my very favourite work colleagues.   I had such fun sorting through my ever growing fabric stash and deciding which fabrics would suit who?  In the end, the fabrics spoke to me and the choice became very easy.


So, let me introduce you to "Michelle"

Now a couple of weeks ago I was lucky enough to receive a fabric grab bag from the girls at Fabric Traders.Co in response to a blog I posted about their fabulous new on line fabric store.  You can read about it HERE.

Amongst the gorgeous fabrics in the grab bag was this lovely autumn toned floral print which Michelle immediately fell in love with when I did my little "show and tell" at work, after the parcel arrived.   I knew immediately what I was going to do with it......

I had just enough for a 16" x 16" front and then backed it with a left over piece of painter's drop cloth (from my dining room chairs project) and added a contrast binding.  Aren't these just the most perfect buttons?   I couldn't have got a more perfect match.  I actually picked them up at Beach Vintage when Kendall and I flew down to see DOLLY at the Brisbane Entertainment Centre a couple of weeks ago.
So this truly is a Fabric Traders/Beach Vintage inspired cushion!   Thanks heaps Simone and Jodie.


Next we have "Linda"

There was just something about this pretty blue and yellow fabric that just shouted "Linda" the minute I saw it.  Sweet and gentle - just like her.    Fortunately she loved it just as much as I hoped she would.
Again, I had just enough fabric to make a 16" x 16" cushion and trimmed it with a piece of matching stripe (which for some reason strangely reminds me of Bananas in Pyjamas??)  The floral and stripe were both Spotlight finds.

I then sorted through my button tin and found these rather interesting blue buttons.  I love the fact that they are mismatched.   For a person who lives and breathes symmetry, they were a bit of an odd choice but I'm really happy with the way they look.

And finally, we have Julie

This was such a tough one.  I adore this gorgeous blue and white fabric (again, from Fabric  Traders. Com) and only had just enough to make one only cushion.  I was SO tempted to keep it for myself.   Hopefully Julie will get just as much pleasure from it as I did in making it for her.
I think the gorgeous little bobble trim and crisp white buttons really sets it off.  It was SO hard to let this one go - but I know it is going to good home.  Merry Christmas Julie!

Oh, and by the way........


Fabric Traders.Com are having a little sale at the moment - 17% off for the next 3 days.


 I can hear all those beautiful fabrics calling my name.  Yes, you can hear them too!!


Wednesday, November 9, 2011

Brown Paper Packages.....


How I love receiving parcels in the mail!  

The thrill of anticipation as I skipped up the steps of my local Post Office this morning and pressed the little "out of hours" buzzer.    It reminds me of exactly how I used to feel as a small child when my Nan (who lived ALL the way away in Sydney!) would send us parcels for Birthdays and Christmas.  Her parcels were always wrapped in really thick brown paper and tied securely with jute string with a neat little bow at the back.   She had the most beautiful handwriting - a very distinctive backward sloping script with lots of flourishes and scrolls.  The sort of writing that you see these days in vintage manuscripts.

It's amazing how the simple act of collecting a parcel from the Post Office today can evoke such memories of the past. 

So with my Express Post parcel in hand,  I couldn't wait to tear open the plastic.  Easier said than done I must say - Australia Post are not joking when they say these parcels are tamper proof!  

Yah!   What a surprise.....


The gorgeous fabrics I had ordered from the lovely Jody and Simone at Fabric Traders.com.au on Saturday (last weekend - 4 days ago to be exact)  had arrived!   Talk about SUPER FAST delivery.  I am so impressed!

So be honest - ask me "what I did last weekend" and I can tell you most of it was spent pouring over all the amazing fabrics at their fabulous new on line store.    I am absolutely smitten with everything they have and had to seriously stop myself from ordering more.  (Don't get me started on all the trims and bobble braids and oilcloths  - seriously swoon-worthy!)

These little beauties are destined to join my ever increasing cushion collection.  As I have said (more than once I am sure!)  one can NEVER have too many cushions.  I am the Queen of over-cushioning!


Isn't this just Divine!  "Normandy White" by Bernatex.   I can just see this in my bedroom as part of my new blue and white summer look.   (Definitely ordering more!)


And how about this for a definite pop of red -  "Pallazzo Red" by Alexander Henry.  This is a beautiful medium weight fabric has a real feel of quality about it.   I'm thinking maybe some big white buttons and white binding ?


And this would have to be my absolute favourite - "Tres Chic" by Waverly.  Truly fabulous!   Definitely a candidate for some bobble trim or maybe a gorgeous contrast binding?   Love it to bits.  I'm thinking it would make a lovely Christmas gift as well - truly unique.


Thank you so much Jody and Simone.

Your shop is amazing and your service incredible!


and thank you also for the $5 discount coupon you very kindly included with my order -
Guess what I'll be doing this weekend?...


Saturday, October 29, 2011

Some Cushion Zhushing

As far as I am concerned - there is no such thing as TOO many cushions.  A single cushion can completely change the whole look of a room and in no time turn it from bland to grand!   
I know some people find them an absolute nuisance -  but not me.  I come from a long line of 
Over-Cushioners!

Mum was an Over-Cushioner.  Her cushioning style was rather random and somewhat  uncoordinated.  Multiple colours and styles - whatever took her fancy really.   She had a thing for anything with either a cat or dog motif and over the years collected some rather interesting(?) examples.

Nan was also an Over-Cushioner and being the fantastic seamstress she was - used to create the most gorgeous hand smocked  round satin creations with large covered buttons in the centre.  She would use a huge darning needle to pierce the cushion and attach the buttons to each side.    Her cushions were a work of art. 


Which leads me to today......

Now,  I'm not entirely sure what lead me to my crazy cushion making frenzy this afternoon!

One minute I was sorting through my fabric stash....... 


And the next, I was cutting out layers and layers of yellow and blue co-ordinated fabric and sewing up a storm!

Buttons, bobble trim, zig-zag - pins flying everywhere......

I was like a woman possessed.


So here we have it.

A whole bunch of cute little blue and yellow creations - perfect for some Spring time cushion zhushing! 

Super easy to make and cost me hardly anything (apart from the inserts)
If anyone is interested - I would be happy to post a little tutorial.


Only problem now........


Where to put them all!


Wednesday, September 21, 2011

A Sneak Peek


Lazybones and Homebodies Pty Ltd
Have you ever seen something and thought "I just have to have that!"   

Well, that is exactly what I thought the very first time I saw this gorgeous Rosette quilt.  I think it is just the most beautiful, luscious, squishy piece of bedroom linen I have ever seen.

I have been in love with it ever since the first time I laid eyes on it 12 months ago.  Since then it has popped up in numerous decorating magazines and a number of beautiful blogs and each time - my heart has skipped a beat.

However at $319 it is WAY more than I could justifiably pay for a quilt - regardless of how fabulous it is.

Quilts and me do not have a good track record.   In fact, I have gone through more quilts than I care to remember.   A small rip here...a colour run there.....I (we) are very hard on quilts!   

It also doesn't help  that Mickey and Buffy have no regard whatsoever for the niceties of life.  I wish I had a $ for every time I had to literally d r r a a g g g  them off the bed!  "Get off that bed Mickey - you naughty dog!!!"    Grrr.......

Lazybones and Homebodies Pty Ltd
So, regardless of my huge case of  "quilt envy" - I had resigned myself to the fact that it was never going to happen.


That was of course, until I saw this.........


On the front cover of this month's "Home Beautiful"

Pang! (sound of arrow piercing my heart)  - there it goes again.   I just LOVE that quilt.
As a matter of fact - I just LOVE that whole bed with its gorgeous lilacs and pop of yellow.  So perfect for Spring.

So, it got me thinking.  

What if I was to make that quilt?    Then if anything did happen to it - well I wouldn't feel guilty at having spent so much buying it.    Perfect!


So that is exactly what I am doing!

At under $60 I have bought all the fabric/backing etc. and have started on this little school holiday project.


Stay tuned for my big reveal + a little tutorial I am putting together on the making of my DREAM quilt.


Wednesday, August 3, 2011

Scatter a Little Kindness

Last weekend I decided to scatter a little kindness around the place...... 
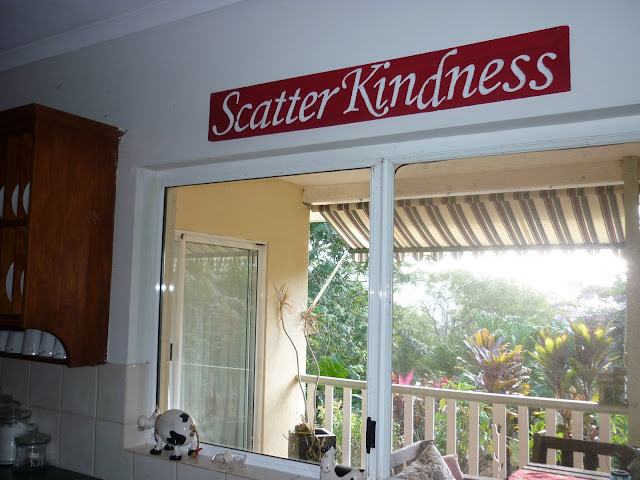
and paint this little sign
which now hangs over my kitchen window


A constant reminder
of how little we really need to do
to make our world a better place.


A super easy project  to make
A length of timber -  a coat of paint – and some type font which I downloaded from the internet
Traced onto the timber and then painted with white acrylic.  Simple.

Why not scatter some kindness around your place?


Posted by Picasa